- Create storage bucket
- Procedure
- Result verification
- Manage storage bucket
- View storage bucket
- Delete storage bucket
- Create a custom transcoding template
- Procedure
- Result verification
- Manage transcoding template
- View template
- Modify template
- Delete template
- Create a transcoding task
- Procedure
- Result verification
- View the detail of a transcoding task
- Procedure
- Usage statistics
- Account Security Settings
- Background
- Procedure
- Result verification
- Follow-up operations
This manual shows you how to perform transcoding-related operations in the Media Processing Service console.
Create storage bucket
Add your own storage bucket in the AuroraCloud VOD console is needed if you want to store the output files in your own storage bucket.
Procedure
Log in to AuroraCloud VOD console.
In the left navigation pan, choose Outputs.
Click + Create a output.
Enter the storage related parameters in the Create a output dialog box.
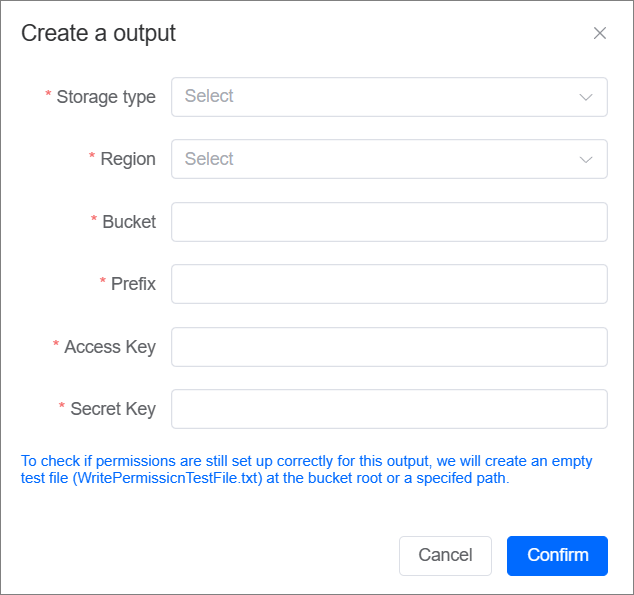
Parameters Description Storage type The name of cloud storage service.
Currently, AWS S3, Ali OSS,Tencent COS and Ksyun KS3 are supported.Region The region where the cloud storage service is located. Bucket The name of your storage bucket. Prefix The prefix of storage bucket path. Access Key Accesskey ID of your storage bucket. Secret Key Accesskey Secret of your storage bucket. Click Confirm.
Result verification
On Output storage page, you can see the storage bucket just created.

Manage storage bucket
The AuroraCloud VOD console supports viewing and deleting storage bucket. This topic describes how to view and delete storage bucket.
View storage bucket
Log in to AuroraCloud VOD console.
In the left navigation pan, choose Outputs.
Click Detail on the row of the target storage bucket.

Delete storage bucket
You can delete unnecessary storage bucket in the AuroraCloud VOD console.
Log in to AuroraCloud VOD console.
In the left navigation pan, choose Outputs.
Find the storage bucket you want to deleted.
Click Delete on the row of the target storage bucket.

Create a custom transcoding template
A series of transcoding templates have been setup in the system as presets. You can also customize the transcoding templates as needed. This topic describes how to create customized transcoding templates.
Procedure
Log in to AuroraCloud VOD console.
In the left navigation pane, choose Templates.
Click + Create a template.
Set related parameters.
Set basic parameters.
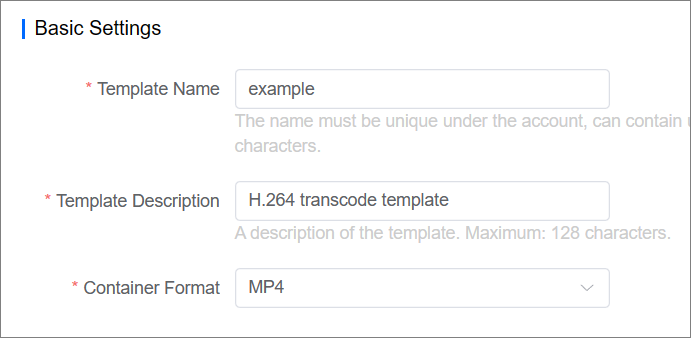
Parameters Description Preset Name The name of transcoding template. Preset Description The description of transcoding template. Container Format The format of output video, value: - MP4 (default)
- FLV
- HLS
Where:
If Container Format is set to MP4 or FLV, go to the step ii. Set video parameter.
If Container Format is set to HLS, configure the following HLS-related parameters.
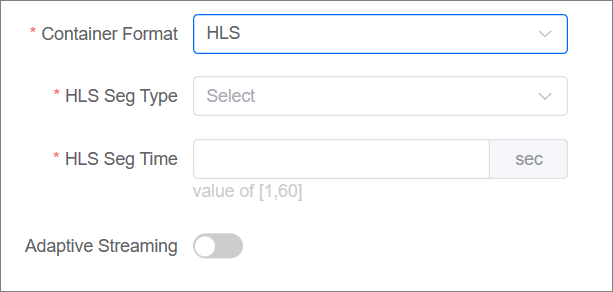
Parameters Description HLS Seg Type The type of HLS segment, value: - mpegts
- fmp4
HLS Seg Time The length of the segment. It is recommended to set HLS Seg Time to an integer multiple of the seconds between adjacent keyframes. Adaptive Streaming The switch of adaptives. Where:
If the switch Adaptive Streaming keeps off, go to the step ii. Set video parameters.
If the switch Adaptive Streaming set to on, configure the following adaptive-related parameters, and go to the step iv. Set watermark parameters.
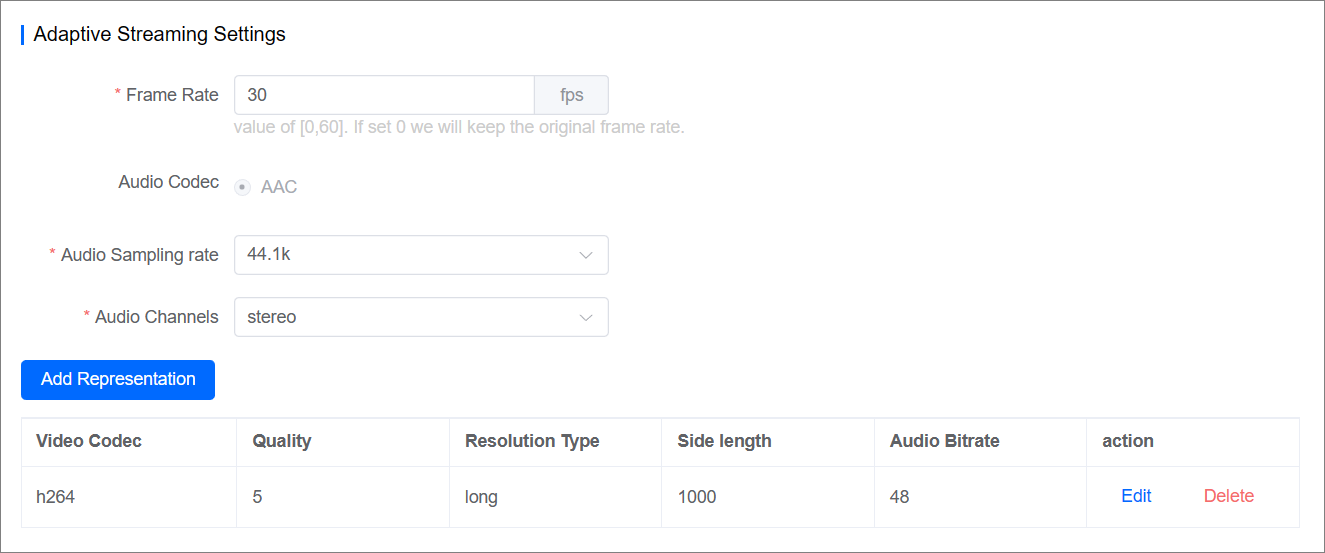
Parameters Description Frame Rate The frame rate of output video, vaule: 0~60fps,0 indicates that keep the frame rate as source video. Audio Codec The format of audio compression. Only AAC is support currently. Audio Sampling rate The sampling rate of audio. Value: - 48k
- 44.1k (default value)
- 32k
Audio Channels The type of audio channels, value: - mono
- stereo (default value)
Add Representation Video Codec The video coding format of substream, value: - H.264
- H.265
- AV1
Quality The video coding quality of substream, vaule: 1~10, default value: 5. Resolution Type The resolution policy of substream, value: - Same as input: keep the resolution as source video
- Fixed long side: enter the length of long side. The video is scaled proportionally to the length of the long side.
- Fixed short side: enter the length of short side. The video is scaled proportionally to the length of the short side.
Audio Bitrate The audio bitrate of substream, value: - 0 (keep the original audio bitrate)
- 32
- 48
- 64
- 96
- 128
- 256
Set video parameters.
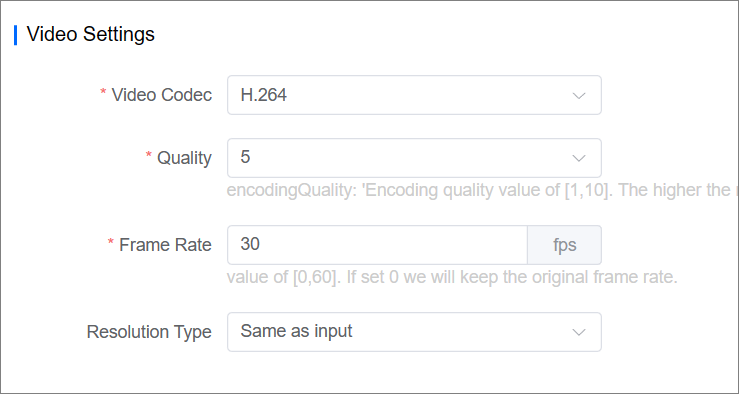
Parameters Description Video Codec Video encoding standard, value: - H.264
- H.265
- AV1
Quality The quality of encoding, value: 1~10, default value: 5. Frame Rate The frame rate of output video, value: 0~60, unit: fps. Resolution Type The policy of resolution, value: - Same as input: keep the resolution as source video
- Fixed long side: enter the length of long side. The video is scaled proportionally to the length of the long side.
- Fixed short side: enter the length of short side. The video is scaled proportionally to the length of the short side.
Set audio parameters.
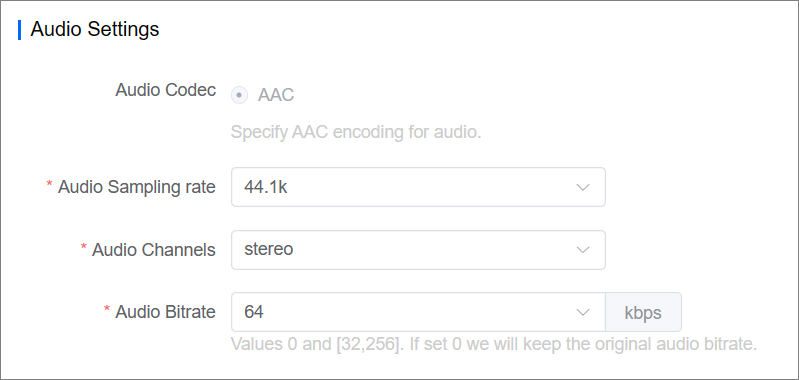
Parameters Description Audio Codec The format of audio compression. Only AAC is support currently. Audio Sampling rate The sampling rate of audio. Value: - 48k
- 44.1k (default value)
- 32k
Audio Channels The type of audio channels. Value: - mono
- stereo (default value)
Audio Bitrate The bitrate of audio compression, value: - 0 (keep the original audio bitrate)
- 32
- 48
- 64 (default value)
- 96
- 128
- 256
(Optional) Set watermark parameters.
You can turn on the Text Watermark / Image Watermark switch and set watermark related parameters in Watermark Settings area when adding a watermark to the output file is needed.
Text watermark
Turn on the text watermark switch to configure a text watermark for the output file.
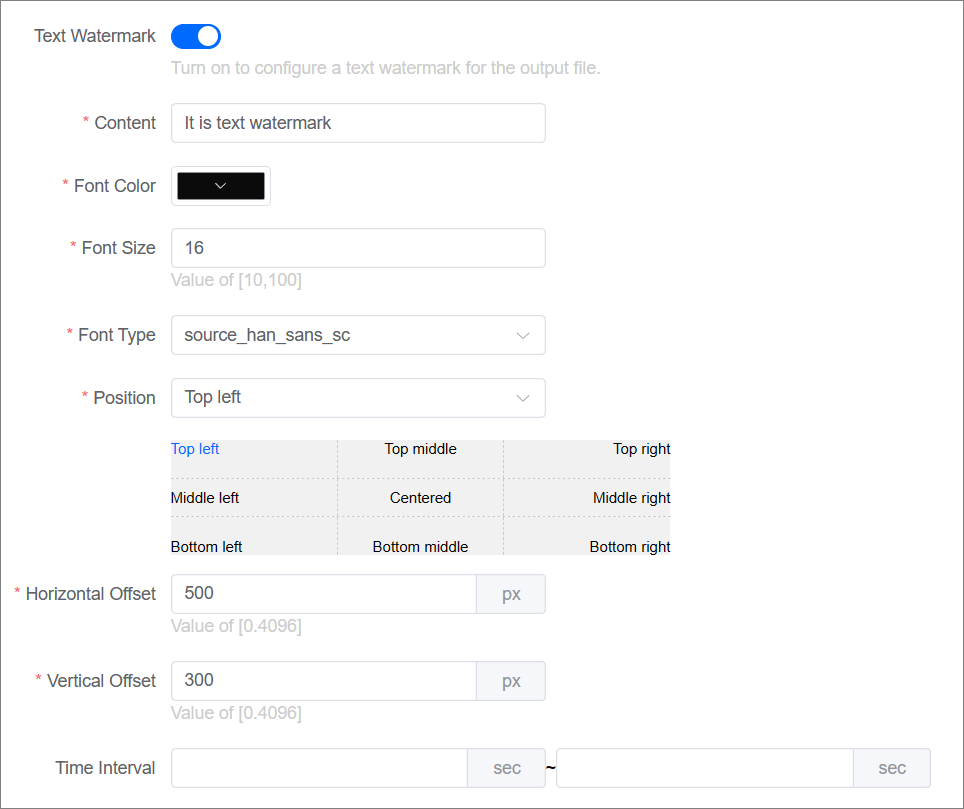
Parameters Description Text Watermark The switch of text watermark. Turn on the switch to configure a text watermark for the output file. Content The content of text watermark. Font Color The font color of text watermark. Font Size The font size of text watermark. Font Type The font type of text watermark. Position The area where the text watermark is displayed in the video screen. Divide the video screen into 12 zones from top to bottom, left to right: Top left, Top middle, Top right, Middle left, Centered, Middle right, Bottom left, Bottom middle, Bottom right. Horizontal Offset The offset of the text watermark in the horizontal direction, value: 0px~4096px.
When Position is set to left side, the value of horizontal offset indicates the displacements that the text watermark moved horizontally from left to right.
When Position is set to right side, the value of horizontal offset indicates the displacements that the text watermark moved horizontally from right to left.
This parameter does not need to be set when Position is set to one of Top middle, Centered, or Bottom middle.Vertical Offset The offset of the text watermark in the vertical direction, value: 0px~4096px.
When Position is set to upper side, the value of vertical offset indicates the displacements that the text watermark moved vertically from top to bottom.
When Position is set to lower side, the value of vertical offset indicates the displacements that the text watermark moved vertically from bottom to top.
This parameter does not need to be set when Position is set to one of Middle left, Centered, Middle right.Time Interval The time period when the text watermark is displayed.
The image watermark is always displayed in the output video when leave the parameter unset.Image watermark
Turn on the image watermark switch to configure a text watermark for the output file.
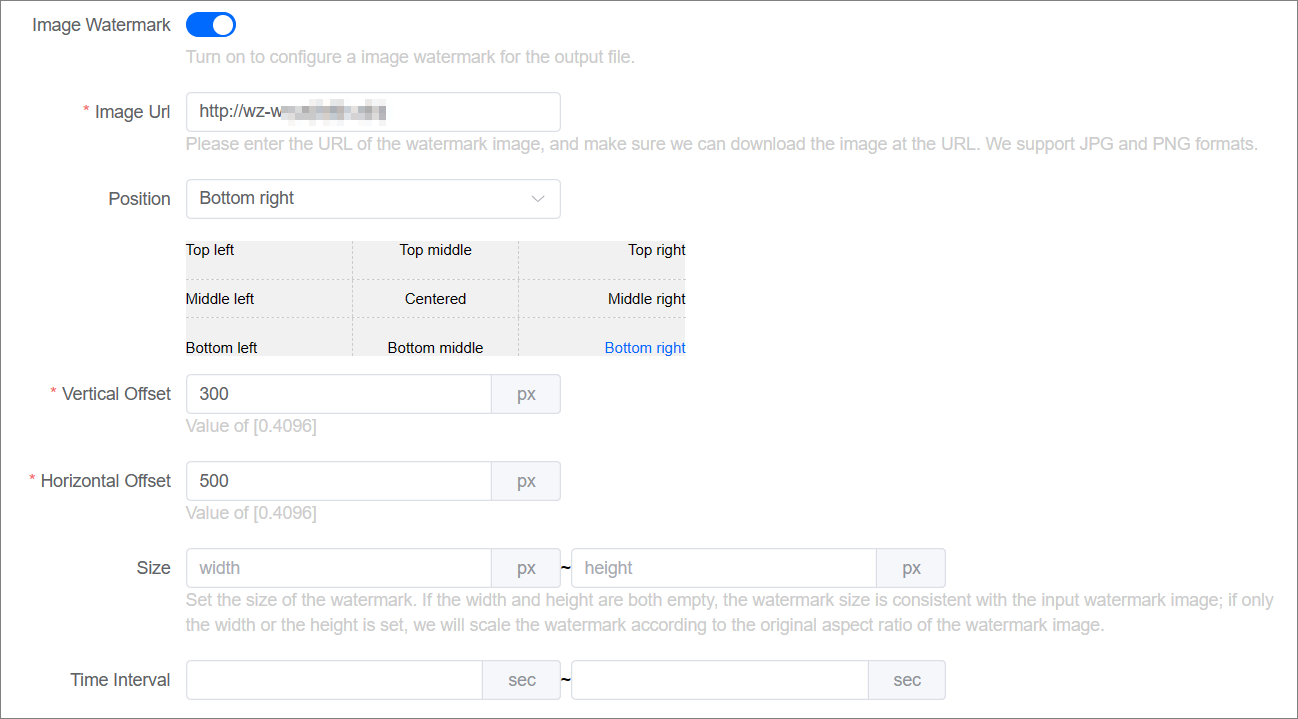
Parameters Description Image Watermark The switch of image watermark. Turn on the switch to configure a image watermark for the output file. Image URL The path where the image is located. Position The area where the image watermark is displayed in the video screen. Divide the video screen into 12 zones from top to bottom, left to right: Top left, Top middle, Top right, Middle left, Centered, Middle right, Bottom left, Bottom middle, Bottom right. Vertical Offset The offset of the image watermark in the vertical direction, value: 0px~4096px.
When Position is set to upper side, the value of vertical offset indicates the displacements that the image watermark moved vertically from top to bottom.
When Position is set to lower side, the value of vertical offset indicates the displacements that the image watermark moved vertically from bottom to top.
This parameter does not need to be set when Position is set to one of Middle left, Centered, Middle right.Horizontal Offset The offset of the image watermark in the horizontal direction, value: 0px~4096px.
When Position is set to left side, the value of horizontal offset indicates the displacements that the image watermark moved horizontally from left to right.
When Position is set to right side, the value of horizontal offset indicates the displacements that the image watermark moved horizontally from right to left.
This parameter does not need to be set when Position is set to one of Top middle, Centered, or Bottom middle.Size The size of image watermark.
If this parameter is not set, the size of the watermark displayed in the video is the same as the size of the source image; if only the width or height is set, the size of the watermark displayed in the video is scaled proportionally to the source image.Time Interval The time period when the text watermark is displayed.
The image watermark is always displayed in the output video when leave the parameter unset.
Click Create.
Result verification
In the Templates page, you can see the customized transcoding template that has just been created.

Manage transcoding template
The AuroraCloud VOD console supports viewing, modifying and deleting customized transcoding templates. This topic describes how to view, modify and delete customized transcoding templates.
View template
Log in to AuroraCloud VOD console.
In the left navigation pane, choose Templates.
Find the target template in the templates list.
Click Detail in the Actions column.

Modify template
Log in to AuroraCloud VOD console.
In the left navigation pane, choose Templates.
Find the target template in the templates list.
Click Edit in the Actions column.

Modify related parameter displayed in Edit a template page.
Note: For the detail about related parameters, see [Create a custom transcoding template](#Create a custom transcoding template).
Delete template
Log in to AuroraCloud VOD console.
In the left navigation pane, choose Templates.
Find the target template in the templates list.
Click Delete in the Actions column.

Create a transcoding task
This topic describes how to create a transcoding task in AuroraCloud VOD console.
Procedure
Log in to the media process service console.
In the left navigation pane, choose Tasks.
Click + Create a New Task.
In the Input area, configure the input information.
AuroraCloud VOD supports three ways to configure the input parameters. Choose one of the following ways as needed.
Click Video Url, and enter the video URL in the Input file text box.

Click Upload Url,and upload local video file.
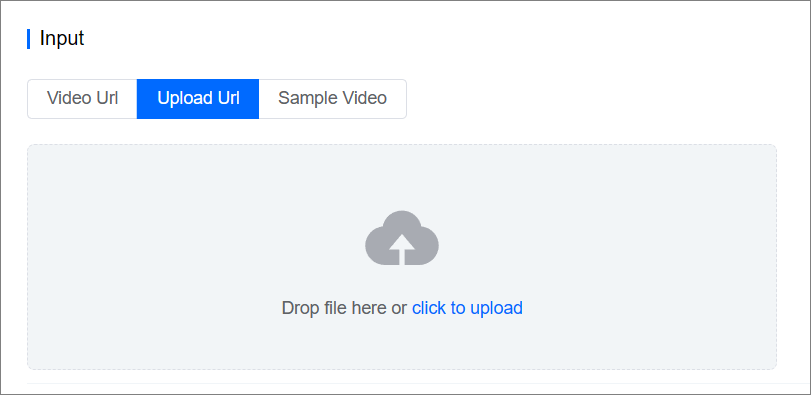
Click Sample Video, select one of sample videos from Sample drop-down list.

Select the transcoding template in the Template area.
i. Click Select.

ii. Select the transcoding template type and the corresponding target template, and click Submit.

Parameters Description Template Type The type of transcoding template, value: - Custom: customized templates.
Note: If the preset templates do not meet your requirements, you can create a customized transcoding template. - Predefined: preset templates.
Template Template Name The name of transcoding template. Container Format The format of output video. Codec Encoding standards. Resolution The resolution of output video. Template Description The Description of template. Trans Mode Trans mode, value: - adaptive
- normal
- Custom: customized templates.
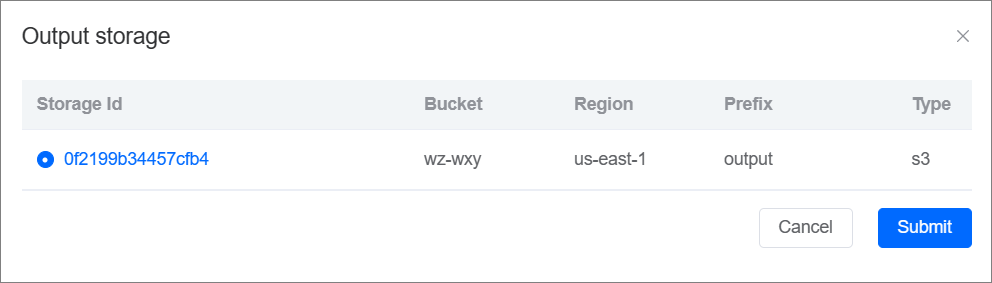
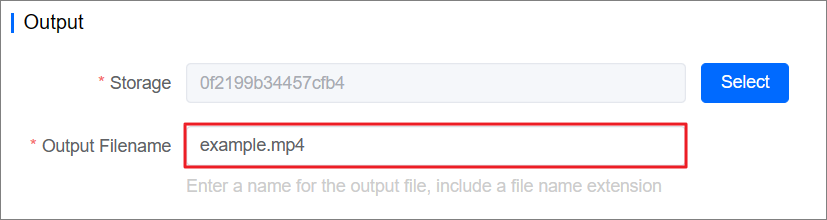
Select the storage bucket for output video in the Output area, and set the file name of output video.
i. Click Select.
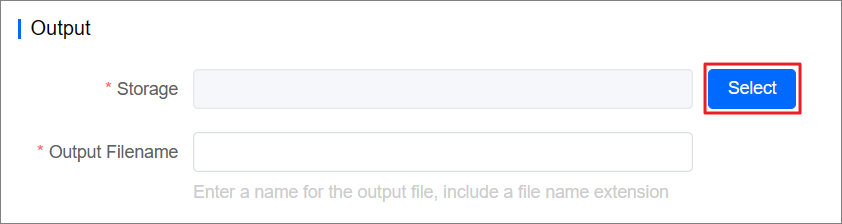
ii. Select the storage bucket and click Submit.
iii. Enter the name of output file in the Output Filename text box with file extension.
Click Create to create transcoding task.
Result verification
On the Tasks page of AuroraCloud VOD console, you can see the status of transcoding task just created. It is successful when Status column shows succeeded.

View the detail of a transcoding task
AuroraCloud VOD supports viewing and deleting transcoding tasks. This topic describes how to view and delete transcoding tasks.
Procedure
Log in to AuroraCloud VOD console.
In the left navigation pan, choose Tasks.
Search for the target transcoding task.
Search by time.
Set the time range, and click Search.

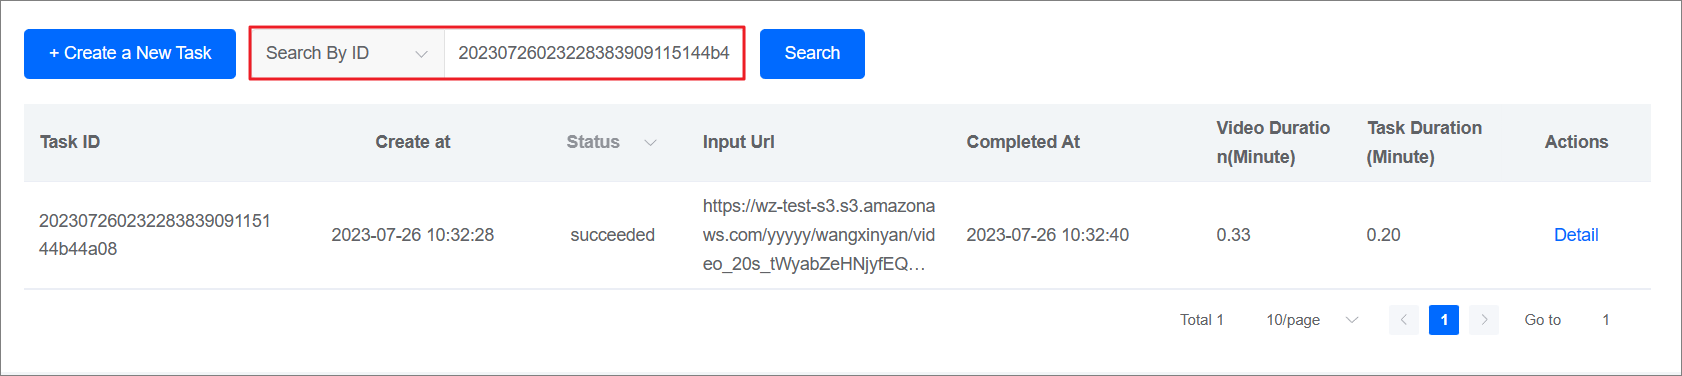
Search by transcoding task ID.
Select Serach By ID in the drop-down list of search type , and then fill in the text box with the task ID. Then click Search.
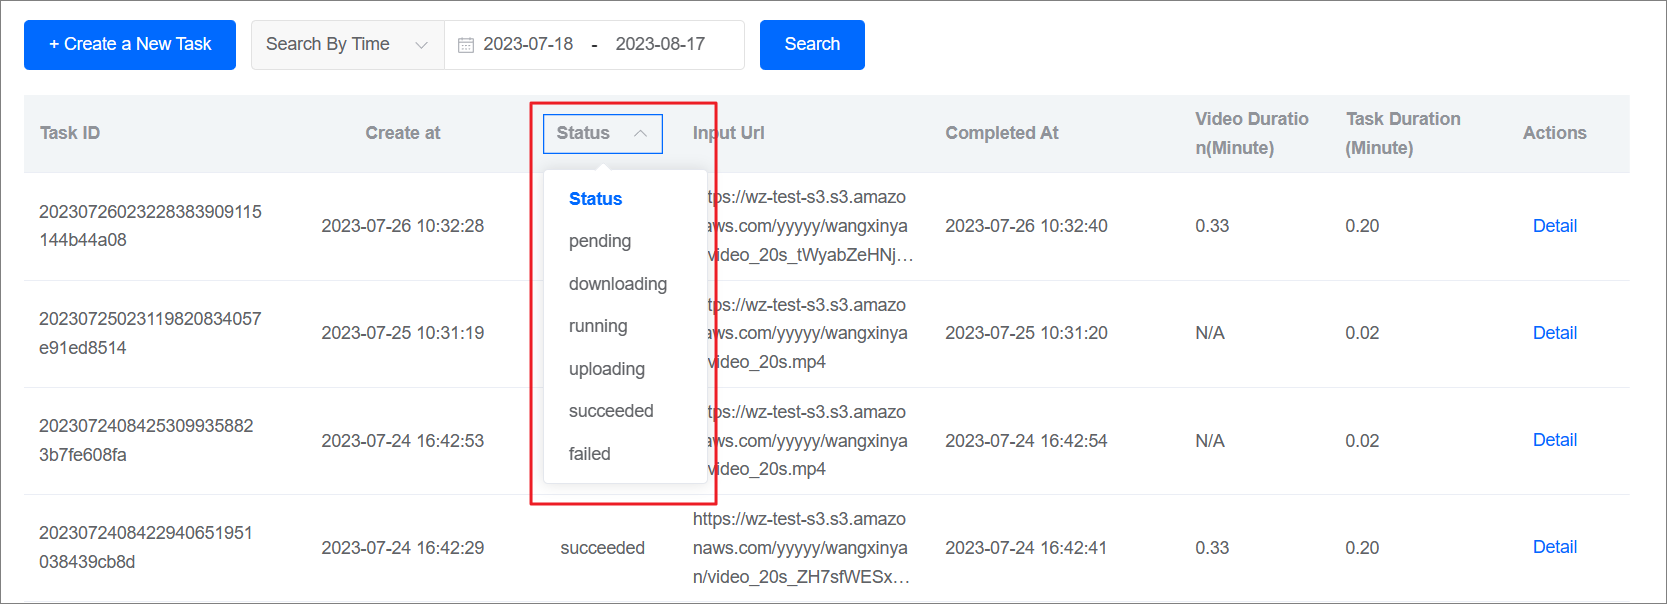
Search by status.
Select the status in Status drop-down list, transcoding tasks that match the desired statu are automatically displayed.
Click Details in the row of target transcoding task.
On details page, you can view the basic information, the transcoding template used, and the settings related to the output of the transcoding task.
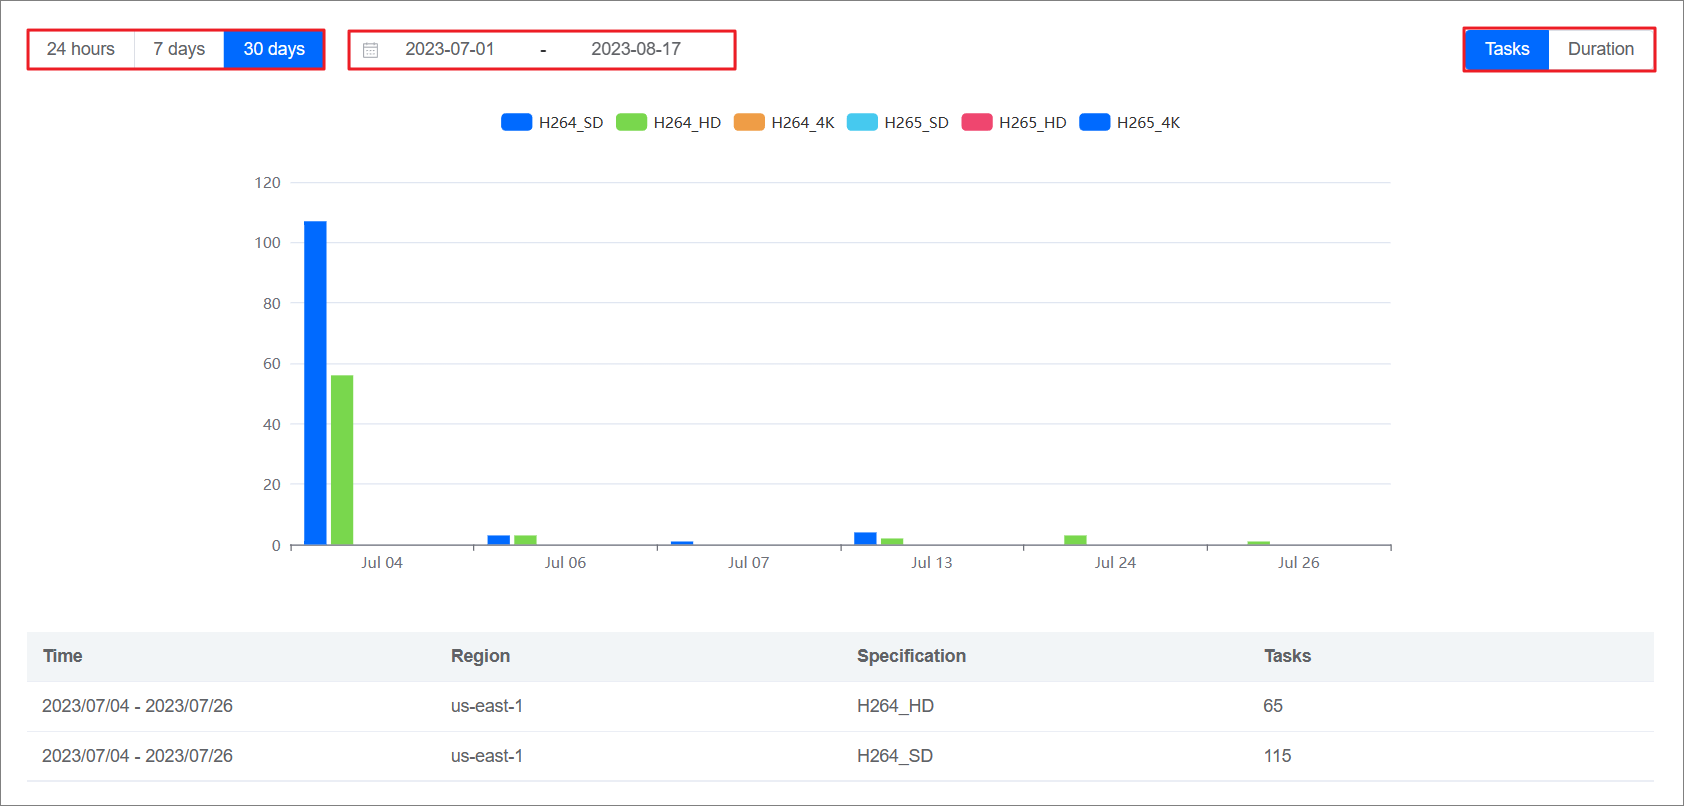
Usage statistics
The AuroraCloud VOD console supports to view usage data during specified period.
Log in to AuroraCloud VOD console.
In the left navigation pan, choose Analytics.
Account Security Settings
You need to create an AccessKey for your account, which is used to verify the identity when calling the AuroraCloud VOD API.
Background
AccessKey includes AccessKey ID and AccessKey Secret.
AccessKey ID: AccessKey ID used to identify the user.
AccessKey Secret:AccessKey Secret used to authenticate the user.
Notice: AccessKey Secret is confidential.
Procedure
Log in to AuroraCloud VOD console.
Click the icon of account at the top right of the page, click User Center.
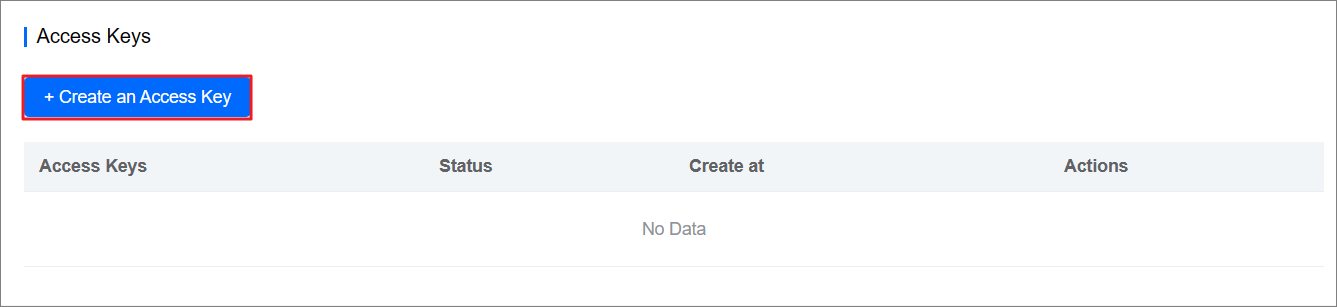
Click + Create an Access Key on the displayed page。
The Create an Access Key dialog box is displayed, and click Download Access Key.
Note: Access Key will displays once, please download it promptly. Access Key is confidential, please do not disclose it.
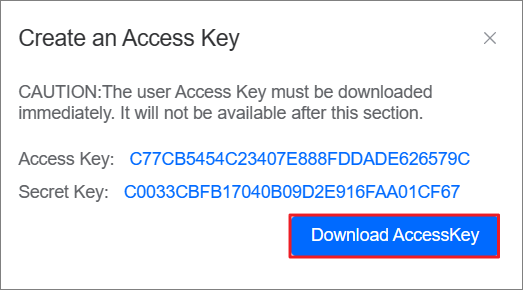
Close Create an Access Key dialog box.
Result verification
In the Access Keys area of the User Center page, you can see the Access key that has just been created.
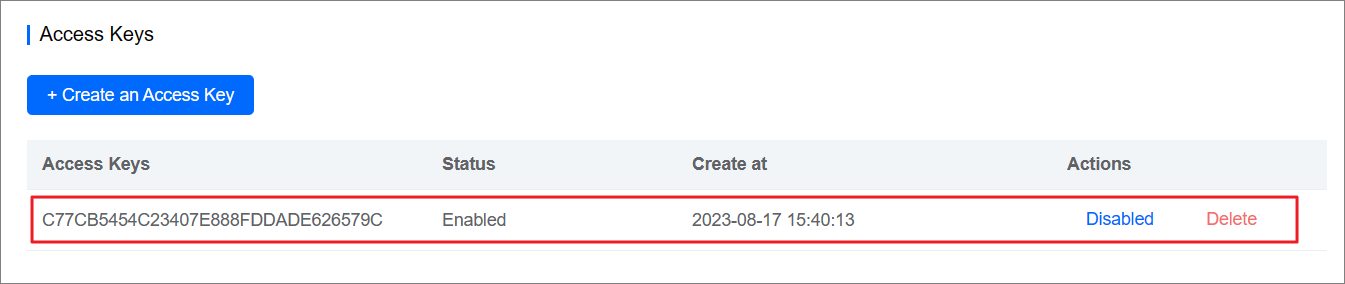
Follow-up operations
You can disable the Access key by clicking Disable or delete the Access key by clicking Delete on the row where the target Access key is located on User Center page as needed.
